Easy


So I have been away for a bit, and not posting so much on here because I was out of commisson for a while. My (dominant) hand got slammed in a car door and broke it, and honestly one of the first things I thought of was:
"That's it. There goes my hand. Now I won't be able to draw anymore." Then suddenly my dramatic mind went even further: "You're not ever going to be able to draw again… or paint… or do crafts… or anything with creative with your hands.. ever." I was so emotionally distraught by this notion that the idea of myself not ever being able to create again overshadowed the actual physical pain I was currently feeling and soon to be more pain from the blood rushing into my now blackish-blue, throbbing thumbnail.
But I am happy to say that I might have overreacted a tad, and that my mind like to go to the "worst-possible-scenario" place. But now that's all over and done with, and now I'm back! Ready to do more crafts and posts for all you out there. It took a while and about four months for my nail to kinda grow back completely, and have regular movement of my hand, but now I'm ready to go, and ideas for future projects have been percolating in my mind while I couldn't do anything. So I definitely have some fun and pretty things to show you in the upcoming weeks.
YAY!!
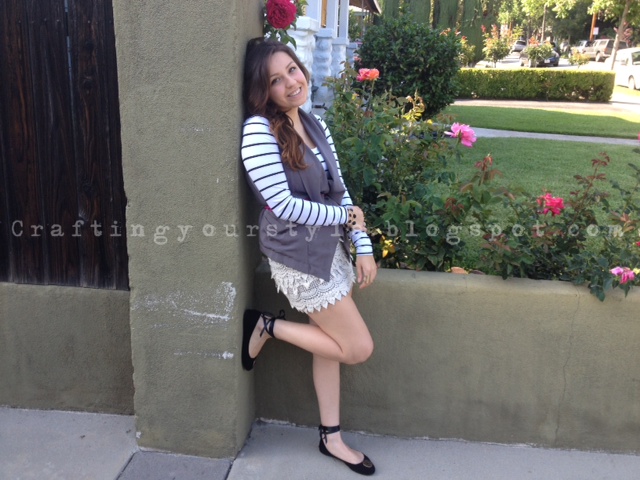
This is the first project since my recovery and since I wanted attention away from my still growing fingernail. I have spent some time on finding eye-catching shoes, and trying to draw attention to my feet instead. After realizing that buying multiple, gorgeously eye-catching shoes, miiighhtt not be the best thing for my wallet. So I thought why not reinvent an old shoe?
and that's what I did :)
WHAT YOU WILL NEED:
- 1 pair of old flats
- 3 yards of ribbon matching your shoes
- 2 oversized decorative buttons or other decorative nic-nac you find with a flat bottom
(I got the buttons I'm using for this tutorial from Joanne's Fabric Store)
- Super glue
- a needle and thread (the color of your shoes)
- and a small piece of elastic (for this tutorial I actually used an old bra strap! yay for not spending money!)


DIRECTIONS:
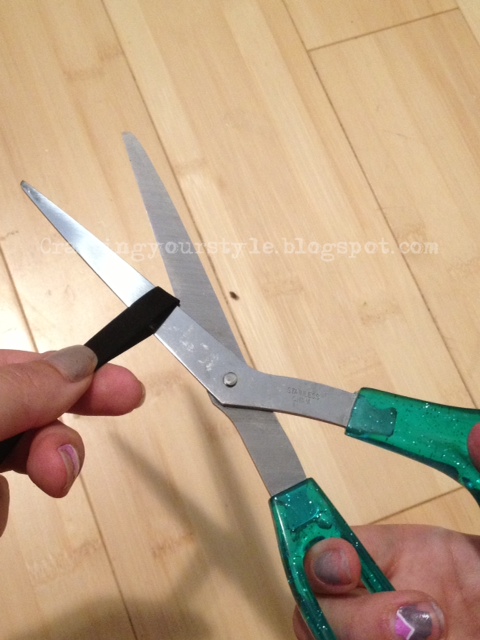
1. First while having your pair of flats in front of you grab the strap of elastic (or bra strap :)) and measure a small loop a bit wider than your ribbon at the heel of the shoe.

2. Cut a little below measured area.
 |
| My loop strand was about 1.5'' |
3. Place newly cut elastic at the heel of the shoe, with the elastic ends inside and just a small loop is sticking out. Start sewing the elastic from the inside of the shoe so as to get the sewing knot on the inside and not seen on the outside (don't worry you won't feel it after).

Go over it a couple times with several stitches covering the width of the elastic and securing it in place.

4. Now we just need to tie it off! Now make the last sewing motion back toward the inside of the shoe (where the needle is pointing the inside) and pull all the way through. Now make another stitch IN THE SAME DIRECTION but just in the corner this time (as pictured below #1) pull the thread just enough to make a small loop (#2) then go over the needle a few times with the thread before pulling through all the way. This will knot the end of the thread very closely to the fabric and fasten the elastic in place.
 |
| #1 |
 |
| #2 |
 |
| #3 |

5. Repeat steps 1-4 for the other shoe.
6. Now for putting on your embellishment to your shoe. You'll need to play around with your button to find the perfect spot for your trinket.

7. Use the super glue to cover all the flat areas of the BACK of the button, and place on shoe on the perfect spot you just found. Press on the button with one hand beneath the shoe and one hand pressing down to make sure it really holds well.
LET DRY!!

8. After the glue has dried and the button is fairly in place it makes it easier for you to sew it on and really secure it. Start with sewing from beneath the button and coming upward so as you don't see the sewing knot on the top of your shoe.


9. Sew stitches in and out of the holes of the button multiple times to further secure the button. Make the last stitch with the needle pointing downward (as shown below)

Pull tight.
10. You want to get a bit of fabric with your needle from under the shoe, right where you were sewing and make a similar loop to the one where you were sewing the elastic in place. Again twirl some of the thread over the needle and pull through so the knot is securing the button in place. snip off the thread just above the knot you just made.

12. Take your ribbon, fold it in half and cut at the end to make 2 equal lengths of ribbon.
13. Cut the ends at an angle and run a tiny bit of super glue on the ends, so that the ribbon doesn't fray. Let. Dry.

14. After the glue has dried on the ribbon you can string in the ribbon through the elastic loop that is now at the back of the shoe.

15. Put your shoe on and lace up your new ballerina flat delicately around your ankle and sit strut your stuff down the street because you KNOW people will be checking out your "new" shoes :)

ENJOY!!